Service App Features
The Service App contains many features to help with congregation scheduling and congregation ministry. These features can be customised for your conngregations specific needs and even turned on or off, depending on what area(s) you want the Service App to assist with.
-
Extensive Compatibility
-
Compatible with most modern browsers and platforms. Works like an app on mobiles, but easily used on desktops and tablets.
-
Map Organising
-
Give every publisher access to electronic maps. Built to handle Residential, Business, High Density, Rural and Foreign maps. Enables map assigning and recording of NHs.
-
Field Service Reporting
-
Submit reports using the Service App. Automatically organised and collated for easy viewing by Group Overseers and the Secretary.
-
Public Witnessing Carts
-
Easy scheduling of the public witnessing carts. Allow publishers to book themselves in, or take full manual control.
-
Meeting Scheduling
-
Scheduler for both CLaM and Public Meetings. Send email reminders from the system.
-
Service Group Scheduling
-
Create fully automated group scheduling. Able to handle standard, rotating and special one-off groups.
-
Attendant Scheduling
-
Create fully automated attendant scheduler. Ensures no conflicts with assigned meeting parts or dates away.
-
Circuit Overseer Scheduling
-
Use the Service App to prepare for the CO visit and generate a schedule for the congregation.
Each publisher gets access to the Service App by way of a unique link. This link grants them access and permissions within the Service App granted to their user account.
It is important that users do not share this link with other publishers, otherwise they may not be able to access data or perform actions specific to them.
Important: The unique link identifies each publisher, do not share this link with anyone else.
When creating a new publisher in the Service App, you have the opportunity to assign them a role. These roles are not restricted to only one publisher, so multiple publishers can have the same role. The role determines what permission this publisher has within the app - permissions that either restrict or allow the viewing, adding, editing and deleting of data within the app.
To see the roles and permissions got to Settings > Roles.
There are default roles and permissions already loaded into the app for every congregation account. These can be viewed, and you can use the edit button to see what permissions each role has. Changes cannot be saved to these default roles since they are being used for every congregation. However, you can create your own custom roles that will only be seen by your congregation. These can be set up in any manner you like, to ensure your publishers get whatever access you determine is appropriate within your congregation account.
The Service App is not available in any store (like Google Play, or Apple App Store), instead access is by invite only. It is built as a PWA (or Progressive Web App) meaning it can be opened on practically any device with a browser. When opened on a mobile device it can be added to your home screen using your device's default browser; it will then operate very similar to a standard app.
If you wish to use your computer for inputting data or further management, simply send an invite via email to yourself and open the email link on your computer.
The initial setup of the Service App depends upon what features you want to use for your congregation. We will list the usual setup order and what features require this setup step. Skip any step that is not required for the feature(s) you are using.
Setting these details ensures your congregation is registered in the right location and time zone. This is also where you activate and deactivate different features within the Service App.
Navigate to:
- Settings
- Congregation Details
At the very least ensure your congregation name, country, region, time zone and circuit are correctly assigned.
This is used only if you are going to use the Service App for digital maps.
Navigate to:
- Settings
- Maps
- Tap 'Add Map' button
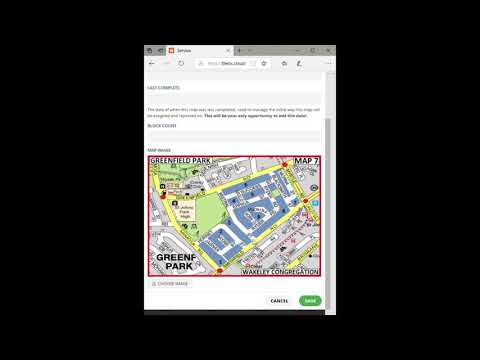
You will be able to enter in the basic map details and then choose a map image. Note: The Service App only uses images for maps (e.g. jpg, png). You cannot upload PDF files.
The Service App will automatically compress large file sizes; generally any map above 1200px in width will be compressed.
Added maps can still be edited and even deleted from the system. Editing maps makes it easy for boundary adjustments, splitting maps or combining maps. Territory records always stay with the map, even if the map number changes.
Used for everything throughout the Service App
This step doesn't need to happen all at once. You can start by just adding a small group of publishers to begin with - for example a test group, ones with critical roles within the Service App, or ones helping to add data to the app.
Navigate to:
- Settings
- Publishers
- Tap 'Add User'
There are many fields in the publisher form, but not all are required. Mandatory fields are first name, last name and role of the publisher. It's important to assign the correct role to each publisher as this will allow or restrict access that the publisher has within the Service App.
Contact Details
The publisher's contact details are required if they have any specific duties within the app. For example, some duties require the app to send them an email, but the system can't do that unless the user has an email address listed. It is recommended that every publisher has their mobile number listed, as it will make it easier to manage the app-generated reminders, but it is not mandatory.
Publisher Appointments
By providing the correct publisher appointment, the app will automatically set the publisher's abilities and/or restrictions within the app (e.g. pioneer, active/inactive, etc.) It also means the congregation makeup will be correct if you generate a congregation report.
Inviting Publisher to the Service App
After adding a publisher you may then invite them to the Service App.
Next to each publisher name is a yellow button, this is the invite button. From there choose SMS or email invite. Each time it is clicked and you confirm you wish to proceed, a token and unique link is generated for that publisher.
If you want to invalidate any previous tokens (e.g. the publisher lost their device), select the option "Reset Publisher Access Token" before sending the invite. This means the publisher will only be able to access the account with the new token (any previous token(s) will no longer work).
After tapping the yellow invite button, and choosing the type of invite, your device should then load a pre-written text message or email ready for you to hit send.
This is used only if you are going to use the Service App for digital maps, do not calls and NHs.
After adding in all your digital maps, the next step is to add all the required data for working them. This is done map by map.
Navigate to:
- Maps
- Select the map you wish to work on
You will see two drop-down expandable fields, 'Do Not Calls' and 'Streets'. This is the time consuming part of the maps set up, as all the streets on each map need to be added in.
- Expand the 'Streets' accordion
- Tap the 'Add Street' button
It's a simple field for the street name to be added in and then saved. Once the streets have been added they will be shown whenever adding a Do Not Call or Address to the map.
To Add a Do Not Call:
- Expand the 'Do Not Calls' accordion
- Tap the 'Add DNC' button
After filling out the Do Not Call form and saving, it will then be shown in the map's Do Not Call list, along with the date the Do Not Call was added.
Do Not Calls highlighted in green mean they are over two years old and are due to be confirmed.
Only used if you're using the app to schedule field service groups, or as a way for publishers to easily see the congregation field service arrangements.
By adding in the field service groups, publishers will always have access (via the Service App) to the congregation's field service arrangements. Set up correctly, each publisher will have a personally curated schedule of field service arrangements.
Navigate to:
- Settings
- Groups
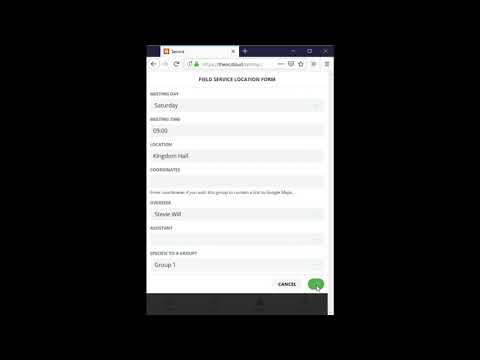
- Tap 'Add Group'
After adding all the congregation field service groups, along with their overseer and assistant overseer, you will then be able to assign publishers to that group.