Map Organising
One of the main views within the Service App is the maps.
All the congregation maps appear here as boxes, in order of their map number. All publishers will be able to see and access each of the maps; however, access within each map will be different depending on the role of the publisher.
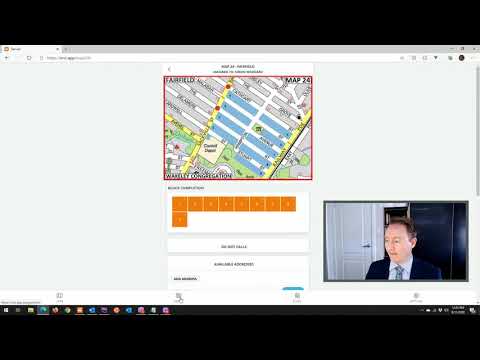
Once you have clicked through onto an individual map, you will see the map number and map suburb at the top of the view, followed by an image of the map (on mobile devices you can use a pinch gesture to zoom in and out).
Depending on the role of the publisher and the state of the map assignment, you may also see:
Block Completion - The current map blocks that can be marked complete or not
Do Not Calls - A list of the current Do Not Calls on this map along with the dates they were added
Available Addresses - A list of addresses (NHs) added to the map during its current assignment
Street - An editable list of streets within this map's boundary.
The publisher assigned a map will see check boxes beside the map's blocks. These blocks can be marked as done or not done. A publisher can hand a map in even if it is incomplete. As map progress is saved, the next publisher assigned the map will be able to see what blocks have been completed and can easily continue from where the last publisher left off.
This expandable section shows all the Do Not Calls (DNC) on an individual map, listed by street name and street number. DNCs can be seen by all publishers. Some roles will be able to delete and update DNCs, using the buttons beside each listing. When a record is highlighted in green it indicates that two years have passed since the address was last confirmed as a DNC, and is due to be checked by appropriate brothers.
This section appears when a map is assigned. It allows for individual addresses to be recorded. As these addresses are connected to the map, they can be assigned and visited at other times. This section can be viewed and audited by all publishers.
For instructions on using a map for letters/telephone, please see Pre-loaded Addresses.
Please note: this section is a master list of addresses. While a publisher can work from it directly, it is highly recommended that after addresses are added, publishers work from their Assignment area instead (see Using Available Addresses (NHs)).
When an address is recorded here it is made available to all publishers. If an address is recorded by mistake, it can be removed by pressing the Green Thumbs Up button.
This button is located at the top of the section, and displays a form allowing you to input a new address. You must select the street name from the drop down list. If the street is not on the list, you can add a new one by selecting the Add New Street option; a new field will be displayed that allows for the street name to be added. Finally, a street number is required, and a unit number can be added if applicable.
Available Addresses are best handled through the Assignment area in the Service App. Publishers can request as many addresses as they want; unused addresses will be automatically returned at the end of the day.
After visiting, the publisher can mark an address as contacted (thumbs up) or not contacted (thumbs down). After two unsuccessful attempts the address will be automatically removed from this area and handled as per your congregation preferences.
For Pre-loaded Address maps, all addresses will remain with the map until they have been successfully completed (see Pre-loaded Addresses).
Map Assigning is a necessary feature to enable other features (like block completion and address management). By default the two roles of Service Overseer and Map Servant provide administration permissions for the map, however additional roles can be added to view or manage the map assignments.
To access the map assignments view, navigate to Settings > Assign Map. Here you will see map cards for all maps in your congregation. You can order the maps by map number, or by last completed date. Each map card will display a combination of the following information:
Last Complete - How long since this map was last completed
Campaign - If the last (or current) assignment is part of a campaign
Owner - Who this map is currently assigned to
Time Out - How long the current assignment has been active
Completed - The number of blocks completed on the current assignment
Addresses - The number of addresses still left to visit on the current assignment
The Service App allows you to assign maps as a publisher's personal map. Unlike a regular map assignment, a personal map assumes the publisher will hold the map until it is completed.
On a personal map, the master list of available addresses and ability to request addresses will only be accessible to the specific publisher. They can share addresses on their personal map by requesting the addresses in the Assignments area and then selecting (left-swipe) the addresses.
While the assigned publisher is generally expected to complete the entire map, the Map Servant can take control of the map if necessary. This includes reassigning the map to another publisher, recalling the map, or cancelling the current assignment.
The publisher assigned the personal map will be unable to hand it in or hand it off themselves. They will need to ask the Map Servant to reassign it.
Residential maps can be assigned to an individual publisher and then covered block by block (most common method). On these maps, addresses where a householder was not contacted can be recorded. Blocks can be marked complete as they are done, so that if a partially complete map is passed on to another publisher, they can easily tell what has been completed.
Rather than being covered at a block level, Rural maps requires each address to be entered. These maps are set up by first loading in each address (and GPS coordinates if you wish). Once these addresses are entered, they form the map territory. Coverage of the map is by address instead of by block.
For details on how to add addresses to a map, please see Pre-loaded Addresses.
Rural maps are not assigned to a specific publisher; instead, assigning the map makes the addresses available to all publishers in the Assignments area of the app. A publisher can request all addresses on a map if desired.
High Density maps require that each address be pre-loaded into the map. Similar to Rural maps, High Density maps are not assigned to a specific publisher but are available to all through the Assignments area, and map coverage is by address instead of by block.
For details on how to add addresses to a map, please see Pre-loaded Addresses.
Typically, High Density maps are used for apartment buildings and intercom witnessing.
When a high density map is assigned out all the pre-loaded addresses become available and can be crossed off after contact has been made with the householder, or makred as attempted if no one was home.
Because apartments often have dozens (or more) units, it's difficult to manage which households have been contacted (1). It's also important for publishers to remain discrete (2). Service App can help with both of those aspects.
By marking off addresses as contacted or not, the Service App can manage the trail of attempts so publishers don't have to worry about that aspect.
By using the Request Addresses system, the Service App will manage assigning out of addresses to publishers. It will only assign publishers a maximum of five addresses at any one apartment block, this way publishers only need to do a few units and then they can move on to other apartments rather than standing at an intercom for an extended period of time.
High Density maps can also be used for regular door-to-door ministry in the same manner. Some congregations use this method if they want all their maps to be covered by 'crossing off' addresses as they are found home.
Similar to Rural and High Density, Business maps require that each address be entered. The name of the business can also be added.
For details on how to add addresses to a map, please see Pre-loaded Addresses.
Pre-loading Addresses is required for Rural, High Density and Business map categories.
Note: Use the High Density category if using the map for letter/telephone witnessing.
By pre-loading addresses, the map has a master list of all addresses on the map. This step only needs to be completed once, but the addresses can be edited at any time.
Go to Settings > Maps and tap the yellow (map details) button next to the map
Ensure all streets on the map have been added and are listed under Streets
Expand the Preloaded Addresses box and then press the Add Address button
Select street and add house/unit number(s)
Instructions on how to enter a range or multiple addresses are on the form
Once an address is entered, use the blue Add Phone Number button to add the phone number
All addresses and phone numbers will be saved with the map
To assign the map to the congregation, go to Settings > Assign Map > select the Assign button on the map > Save. To assign the map to a specific person, mark as Personal Map before Saving.
For instructions on how publishers can use these addresses, see Using Available Addresses (NHs).